Name: Kelsey Lafaso
Steganography Tool Tutorial
The steganography tool that can be supported by Mac is the Digital Invisible Ink ToolKit. This tool allows a user to hide text within an image. The program has four features encode, decode, simulate, and analysis. The tutorial for this tool is going to be with the encode feature.
-
One the app is downloaded and open it should look like this...
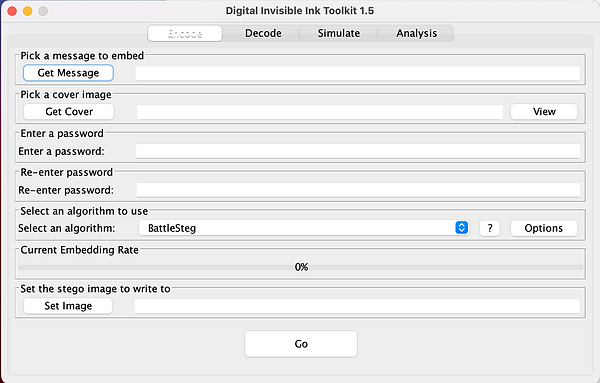
2. Next click the get message button and scroll through the files to find the document that is going to be embedded in the image.

3. Then it is time to select a cover photo. To do this select get cover and select the photo

4. Enter a password and then renter the same password in both the next boxes.

5. Ignore the “Set Algorithm to Use” unless it is needed.
6. Then set the image in the last box and save it.

7. After the image is set click the go button at the bottom and a success message will appear.

8. You will then be able to locate the image where it was saved and view it or you can hit view results on the success message.

9. To decode the message within the picture you would then click on the decode button at the top of the Digital ToolKit.
10. Once in the decode setting click on the Get Image button and select the image you just encoded.

11. Next, enter the password that was provided when encoding the message.

12. Select the same algorithm that was chosen when encoding.
13. Then hit the Send a Message Button and select the file that you want the encoded message to decode to.

14. After everything is all set up hit the go button. A success message just like step 7 will pop up.
15. Then locate the file that was saved when decoding and the encoded message will appear.